5.1.1 Using LifterLMS Groups with Lifter Elements
What this enables
Lifter Elements version 1.7.0 added a full integration with the LifterLMS Groups add-on. With both plugins active, you can:
- Design custom group page templates in Elementor's Theme Builder
- Drop 5 dedicated group widgets into any page or template
- Bind 14 group-specific dynamic tags to text, image, and URL controls
- Gate widget visibility with 4 conditional-logic conditions based on group state, role, or seat availability
- Sell seat-based group enrollment via existing Course Access Plans
This guide walks through each of these capabilities and how they fit together.
This guide assumes you have LifterLMS Groups installed and activated. Without it, none of the widgets, dynamic tags, or conditions described here will appear.
Prerequisites
Before you start designing group-aware templates, you'll want at least one group set up. From the WordPress admin:
- LifterLMS → Groups → Add New Group — creates a new group
- Fill in the Name, Web Address Slug, Visibility, and link it to a Course or Membership
- From the group's Settings tab, click Add Seats to set total seat capacity
- From the Members tab ��→ Manage Members, enable the Invite with Link option to generate a public invitation URL
- Optionally: upload a Logo and Banner, and add a Description on the About tab
The group is now ready to be referenced from Lifter Elements widgets and dynamic tags.
The five group widgets
All five widgets appear in a dedicated Lifter Elements - Groups category in the Elementor widget panel.
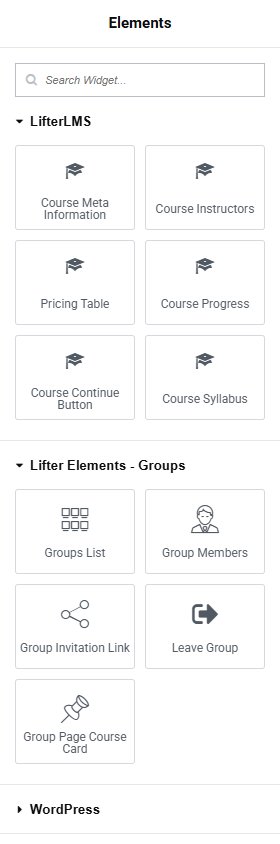
| Widget | Purpose |
|---|---|
| Groups List | A directory grid of groups. Filterable by visibility (Open, Private, Closed) or by the current user's enrollment ("My Groups"). |
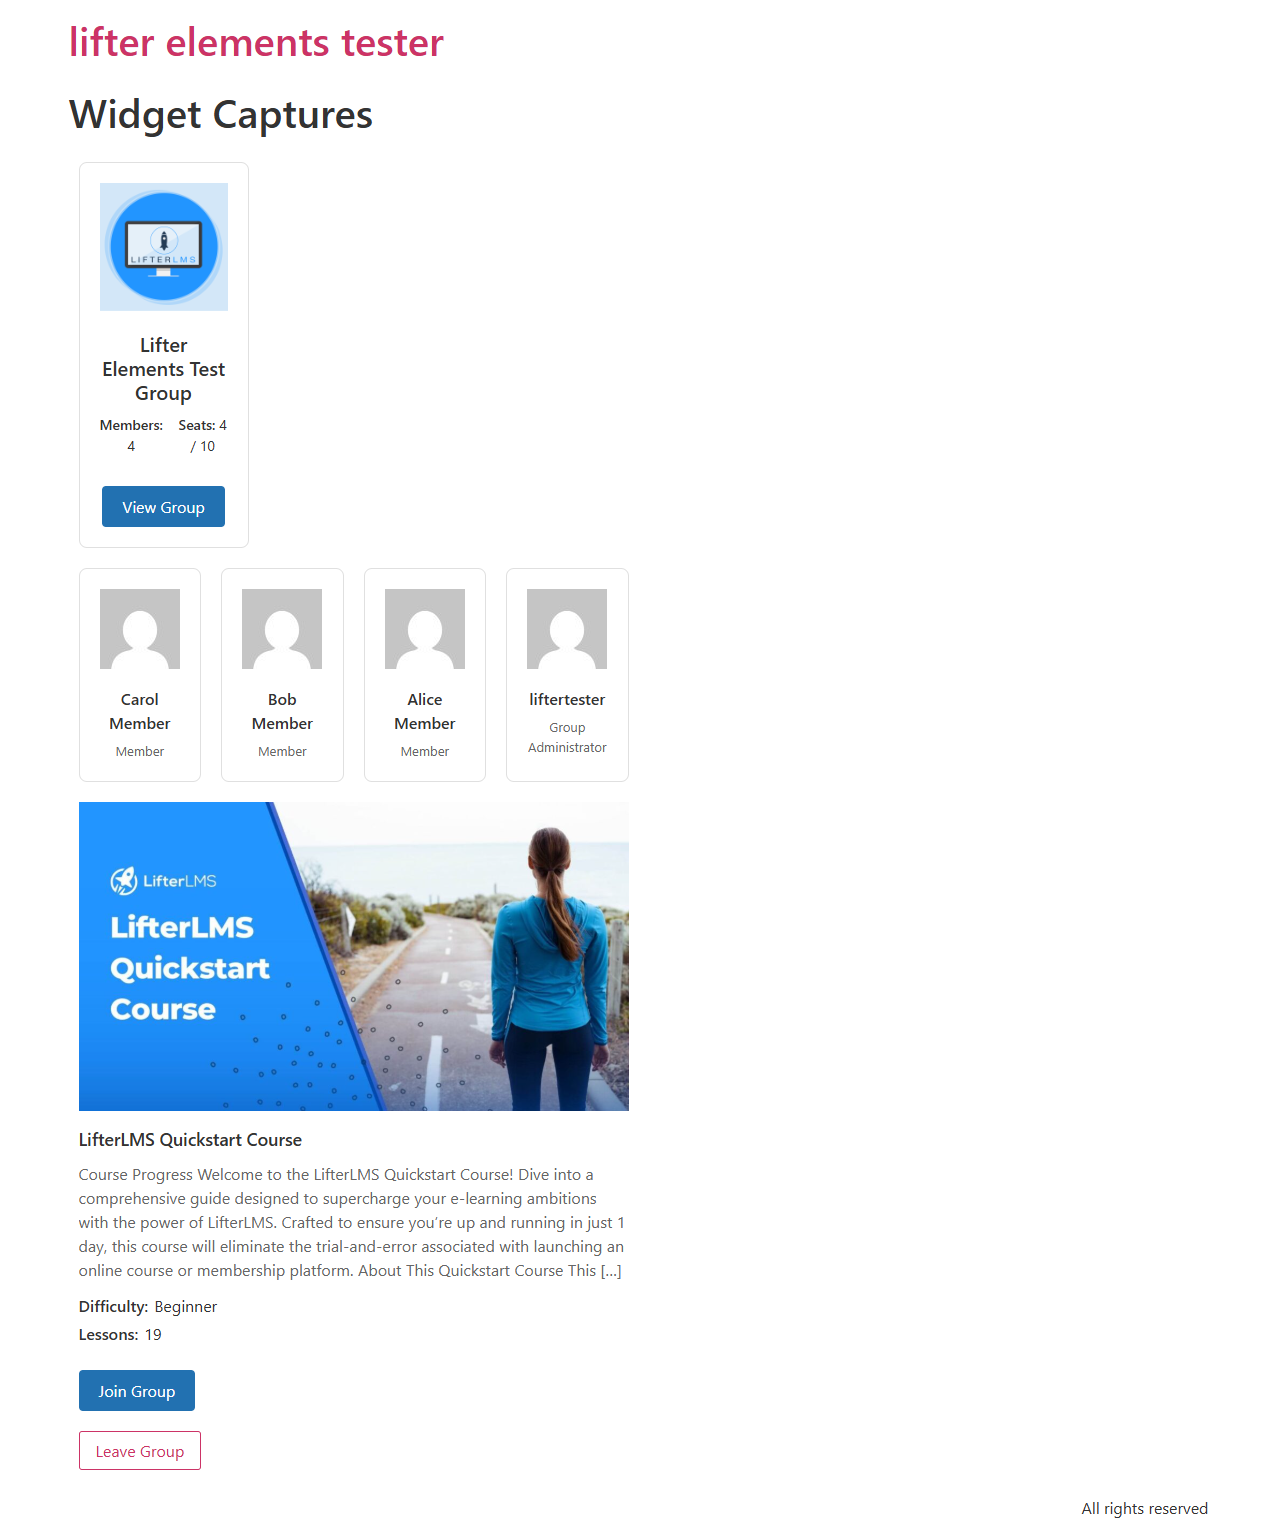
| Group Members | Member grid showing avatars, names, and roles. |
| Group Page Course Card | The course or membership linked to the group, as a card. Auto-detects course vs membership. |
| Group Invitation Link | Button linking to the group's open invitation URL. |
| Leave Group | Confirmation form letting members unenroll themselves. |
All five widgets share a "Use Current Group" toggle — when On, they resolve to whichever group post is currently being rendered (perfect for use in a group page template). When Off, you pick a specific group at design time.
Designing a group page template
The most common use of these widgets is to build a custom group page template in Elementor Theme Builder.
Step 1 — Create the template
- Go to WordPress admin → Templates → Theme Builder
- Click Add New at the top of the screen
- For the Template Type, choose Single Post
- In the conditions setup, set the post type to Groups (the
llms_grouppost type, exposed by Lifter Elements automatically)
Step 2 — Lay out the page
A typical group page template uses widgets in this order:
- Group Banner dynamic tag, bound to a Background Image control on a hero section
- Group Logo + Heading (with the Group Name tag) inside the hero section
- Group Page Course Card to show the linked course
- Group Members grid
- Group Invitation Link button — to invite others
- Leave Group button — for members who want to unenroll
Use the User Group Role dynamic tag in a Heading widget to personalize the page — e.g. "Welcome, {role}". Note that for logged-out visitors and non-members, the tag returns nothing.
Step 3 — Set display conditions
In the Theme Builder publishing flow:
- For all groups: set Display Conditions to All Groups
- For a specific group: set Display Conditions to that group's post
Using dynamic tags
The 14 group-specific dynamic tags appear in the Elementor dynamic tag picker under the LifterElements: Groups group:
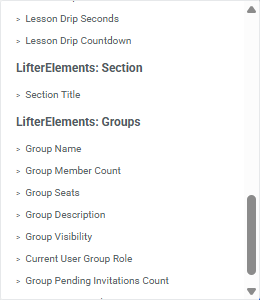
Categorized by the kind of control they fit into:
- Text: Group Name, Description, Visibility, Course Title, Current User Group Role
- Number / Text: Group Member Count, Group Seats, Group Pending Invitations Count
- URL: Group URL, Group Course URL, Group Invitation Link
- Image: Group Logo, Group Banner, Group Course Image
See the Dynamic Tags reference for individual tag pages.
Pattern: linking back to the parent course
Drop a Button widget into your group page template, then bind its Link to the Group Course URL tag, and its Text to Back to course (or use the Group Course Title tag for Back to {course}).
Pattern: showing a featured image of the parent course
Drop an Image widget, then bind its source to the Group Course Image tag. This pulls the WordPress featured image of the linked course or membership.
Gating content with conditional logic
The four new conditions appear in the standard Lifter Elements conditional logic panel (see 4.5 Creating Lifter Elements Templates for the conditional logic basics).
| Condition | Use it for |
|---|---|
| User Group Enrollment | Show/hide content depending on whether the viewer is enrolled in the (current or specific) group |
| User Group Role | Surface admin-only or leader-only controls; differentiate UI per role |
| Group Visibility | Show different UI for Open vs Private vs Closed groups |
| Group Seat Availability | Hide enrollment / invitation CTAs when the group is full |
Pattern: "Join this group" button that disappears when full
- Add a Group Invitation Link widget to your page or template
- Open its Advanced tab → Conditional Logic panel
- Add a rule: Group Seat Availability is Current group has open seats
The button will now hide automatically when the group reaches capacity.
Pattern: leader-only sidebar
- Add a sidebar section to your group page template
- On the section: Conditional Logic rule: User Group Role is Leader of current group
The whole section is hidden from members and admins; only leaders see it.
Seat-based purchasing via Course Access Plans
If you want students to buy access for themselves and additional members, LifterLMS Groups supports group-enrolment access plans that include seat counts at checkout. Lifter Elements extends both the Course Access Plans widget and the Access Plan Button widget to display the seat-count selector automatically when the underlying plan has the Group enrolment option enabled.
Setting it up
- From the WordPress admin, edit the course → Access Plans section
- Edit the plan you want to make group-enrollment-capable
- Find the Group enrolment toggle in the plan settings and turn it On
- Set the default seat count and any other group-related options
- Save the plan

How it appears on the frontend
Once the plan has Group enrolment enabled, the Course Access Plans widget (and Access Plan Button widget) renders seat information above the enroll button. What appears depends on the plan's Seat Selection setting — Fixed or Variable.
Fixed seat selection
When Seat Selection = Fixed, the plan defines a single seat count. The widget shows a static Seats: N label — the buyer cannot change it.

Variable seat selection
When Seat Selection = Variable, the plan defines a min and max. The widget shows an editable Seats number input, letting buyers choose how many seats to purchase within the configured range.

In both cases, at checkout LifterLMS Groups creates a new group for the buyer, allocates the purchased seat capacity, and assigns the buyer as Group Administrator.
The flow end-to-end
- Buyer selects N seats on the Access Plan widget
- Checkout runs the standard LifterLMS purchase flow
- LifterLMS Groups creates a new group with N seats and the buyer as Group Administrator
- Buyer receives an open invitation link (manually enabled from the Members tab → Manage Members)
- Buyer shares the link with N-1 colleagues, who join as Members up to the seat cap
Troubleshooting
The group widgets don't appear in the Elementor panel
The widget category and its 5 widgets only register when LifterLMS Groups is active. Check:
- LifterLMS Groups is installed and activated
- Lifter Elements is version 1.7.0 or higher
- Reload the Elementor editor (hard refresh to bust the widget cache)
The Leave Group widget renders nothing for a leader or admin
This is by design — only users with the role member see the Leave Group button. Group leaders and administrators must be removed by someone with admin-level privileges in the group. See the Leave Group widget reference for details.
The seat-count selector doesn't appear on a Course Access Plans widget
Verify:
- The relevant access plan has LifterLMS Groups Group enrolment turned On in its settings
- The page using the widget has been re-saved in Elementor since the plan's group-enrolment was enabled — Elementor's element cache can serve stale output otherwise
- The widget is targeting the right access plan(s) — check the Access Plans Option in the widget's Content tab
The Group Invitation Link widget shows no button
The button only renders when the group has an open invitation link enabled. To enable:
- Open the group page as a Group Administrator
- Go to the Members tab → Manage Members
- In the Invite with Link section, click Enable link
Optionally set the widget's No Invitation Message to display a fallback string when no open invitation is available.