Best Practices
To maximize the effectiveness and performance of your Lifter Elements and Elementor integration, following best practices is essential. These guidelines help ensure your LMS platform is both user-friendly and technically optimized, providing the best experience for both your learners and administrators. From maintaining site performance to designing clean, intuitive interfaces, implementing these practices can improve user engagement, site speed, and long-term site management.
In this section, we’ll cover the most important strategies to optimize your setup, avoid common pitfalls, and ensure your site remains scalable and efficient as it grows. Whether you’re building courses, customizing membership plans, or using dynamic content, these best practices will help you get the most out of Lifter Elements.
Optimize for Speed & Performance
- Why it Matters: LMS sites can grow quickly with multimedia content, quizzes, and student interactions. Ensuring fast load times and smooth user experience is critical.
- How to Implement: Use optimized images, enable caching, and take advantage of tools like a CDN (Content Delivery Network). Lifter Elements widgets should be kept as minimal as possible to prevent performance lags, and consider using Elementor's built-in features, such as lazy loading.
Design with Learners in Mind
- Why it Matters: The primary goal of your site is to offer a clear and intuitive learning experience. Disorganized content or complex navigation will frustrate users.
- How to Implement: When designing course pages or lessons, use dynamic tags and widgets to display relevant information in a way that is easily accessible. Ensure consistency across all course elements (titles, progress, videos) and avoid overloading pages with unnecessary elements.
Use Staging Sites for Testing
- Why it Matters: Before deploying changes to your live site, it’s essential to test updates and customizations to avoid breaking your LMS functionality or student experience.
- How to Implement: Set up a staging environment for trying out new widgets, customizations, or third-party plugins. This also applies to Elementor Pro features and LifterLMS updates.
Be Selective with Dynamic Tags
- Why it Matters: Overusing dynamic tags can lead to unnecessary complexity and slower page rendering times.
- How to Implement: Only use dynamic tags when they add real value to your courses or lessons. Prioritize tags that provide key information like course progress, lesson content, or enrollment options.
Maintain Regular Backups
- Why it Matters: Site data and student progress are crucial. If any issue arises, you must be able to restore previous versions of the site, including dynamic tags and widgets.
- How to Implement: Use a reliable backup plugin or hosting service. Set up automatic backups and schedule manual backups before making major changes.
Keep Elementor and Lifter Elements Updated
- Why it Matters: Staying updated with the latest version of Elementor, LifterLMS, and Lifter Elements ensures compatibility, security, and access to new features.
- How to Implement: Regularly check for updates and apply them during low-traffic hours to minimize disruption. Ensure you’re using the latest features and bug fixes for improved performance.
Focus on Accessibility
- Why it Matters: Your LMS should be accessible to all users, including those with disabilities. Ensuring an accessible design fosters inclusivity and broadens your potential audience.
- How to Implement: Use accessible color contrasts, add alt text to images, and ensure keyboard navigation works across all dynamic content areas. Elementor’s accessibility features can help implement these best practices.
Displaying Course Meta using Dynamic Tags
Here's a walk-through the basics of using dynamic tags to display course meta the way we do in many of our templates.
Displaying Course Meta In The Icon Box Widget
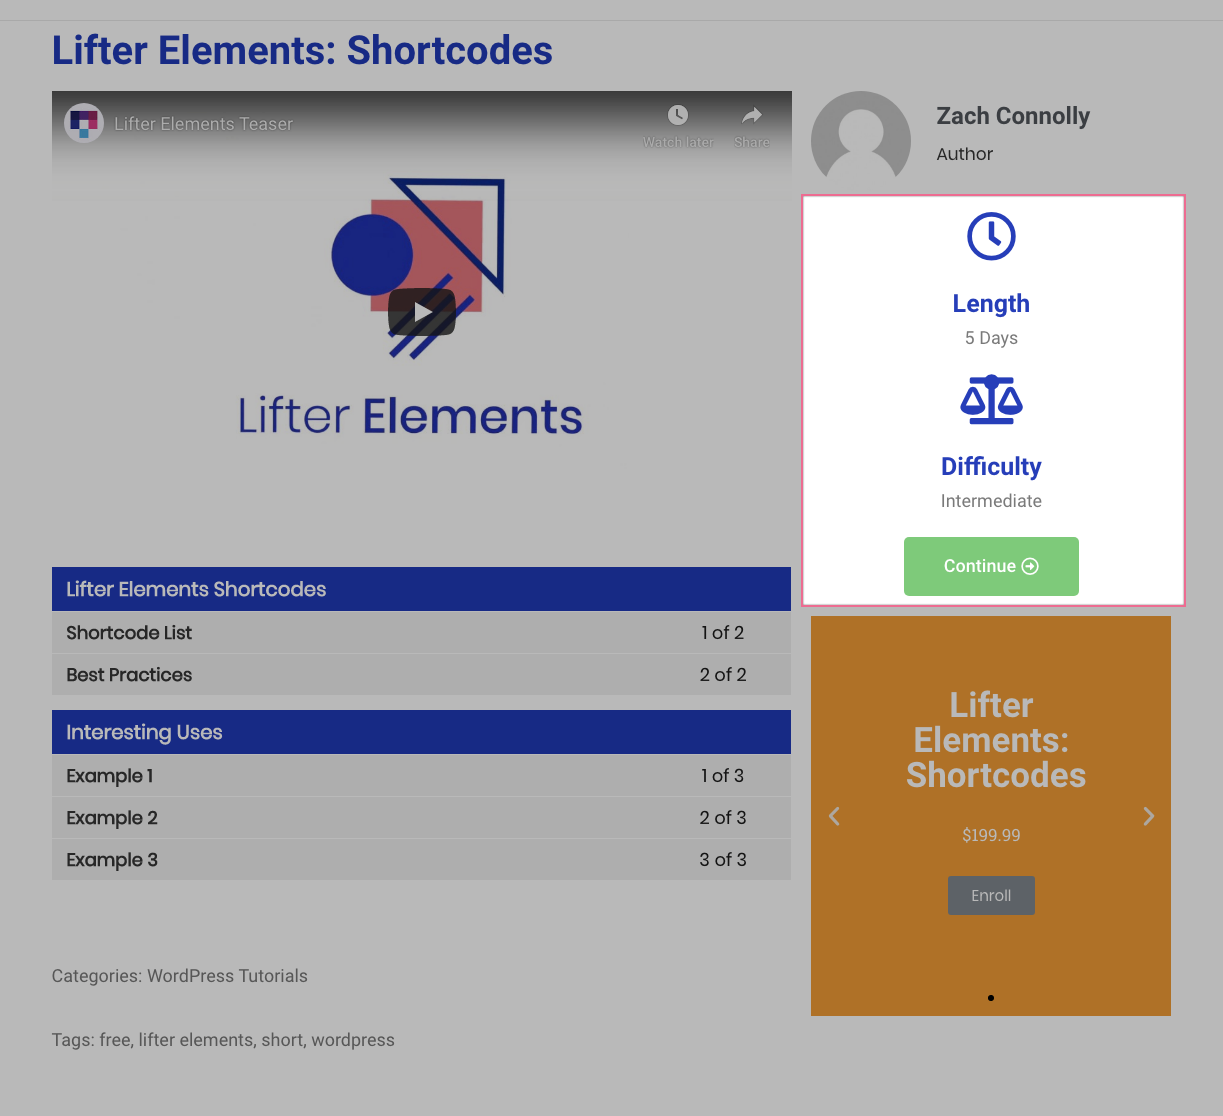
- A simple example would be to add a widget to the sidebar which displays the length and difficulty of the course using dynamic tags.

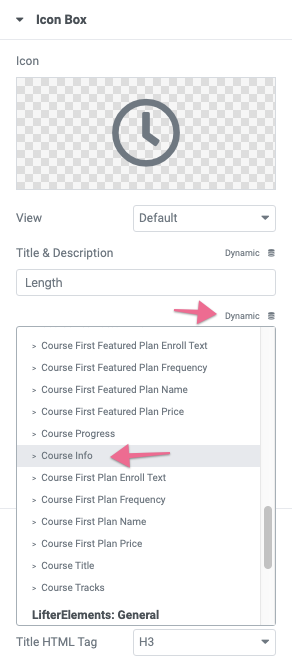
Use the Icon Box widget and add it to the sidebar. Click the Dynamic icon and scroll down until you see Course Info.

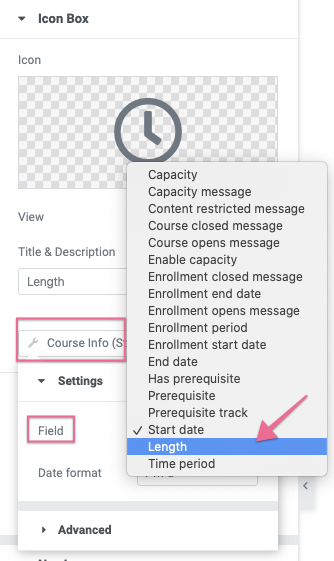
Lifter Elements allows you even more control by adding the ability to click on it again, selecting Field and then Length. This will display the 5 days shown above for the course length using the dynamic tags.

- The same method can be used for the Difficulty in the sidebar using the Icon Box. Simply follow the same steps as above and select Course Difficulty. The course difficulty will now show up in the sidebar.