4. Installation & Use of Lifter Elements
Installation and Setup:
Setting up Lifter Elements is a simple process that requires the installation of both LifterLMS and Elementor. Once these core tools are in place, you can install Lifter Elements to begin building and customizing your LMS site with ease.
Before installing Lifter Elements, make sure you have the following plugins installed and activated:
- LifterLMS: The core LMS plugin that powers your course and membership functionality. You can install it from the WordPress Plugin Repository or purchase the Pro version from the LifterLMS website.
- Elementor: The page builder required for Lifter Elements. You can use the Core (free) version, but we recommend Elementor Pro for access to advanced features and customization options.
1. Installing Lifter Elements
Once LifterLMS and Elementor are active, you can install Lifter Elements:
i. Download Lifter Elements
- Log in to your Tangible account and download the Lifter Elements plugin from your dashboard’s “Downloads” tab.
ii. Install the Plugin
- Navigate to your WordPress dashboard and go to Plugins > Add New.
- Click Upload Plugin at the top of the page.
- Choose the Lifter Elements .zip file you downloaded and click Install Now.
iii. Activate the Plugin
- After installation is complete, click Activate to enable Lifter Elements on your site.
- You should now see Lifter Elements widgets available in the Elementor widget panel when editing pages.
Lifter Elements works seamlessly out of the box with no further configuration needed. However, you can adjust any specific settings within each widget, such as changing the layout or styling, depending on the content and design of your LMS.
If you encounter any problems during the installation process:
- Ensure that Elementor and LifterLMS are both installed and activated.
- Verify that you’re using the latest versions of all related plugins.
- Check for any potential plugin conflicts by deactivating other plugins and testing the installation process again.
iv. License Activation
After you've finished installing Lifter Elements you will want to add your license key to activate the plugin.
- Login to your Tangible account and go to the Licenses tab.
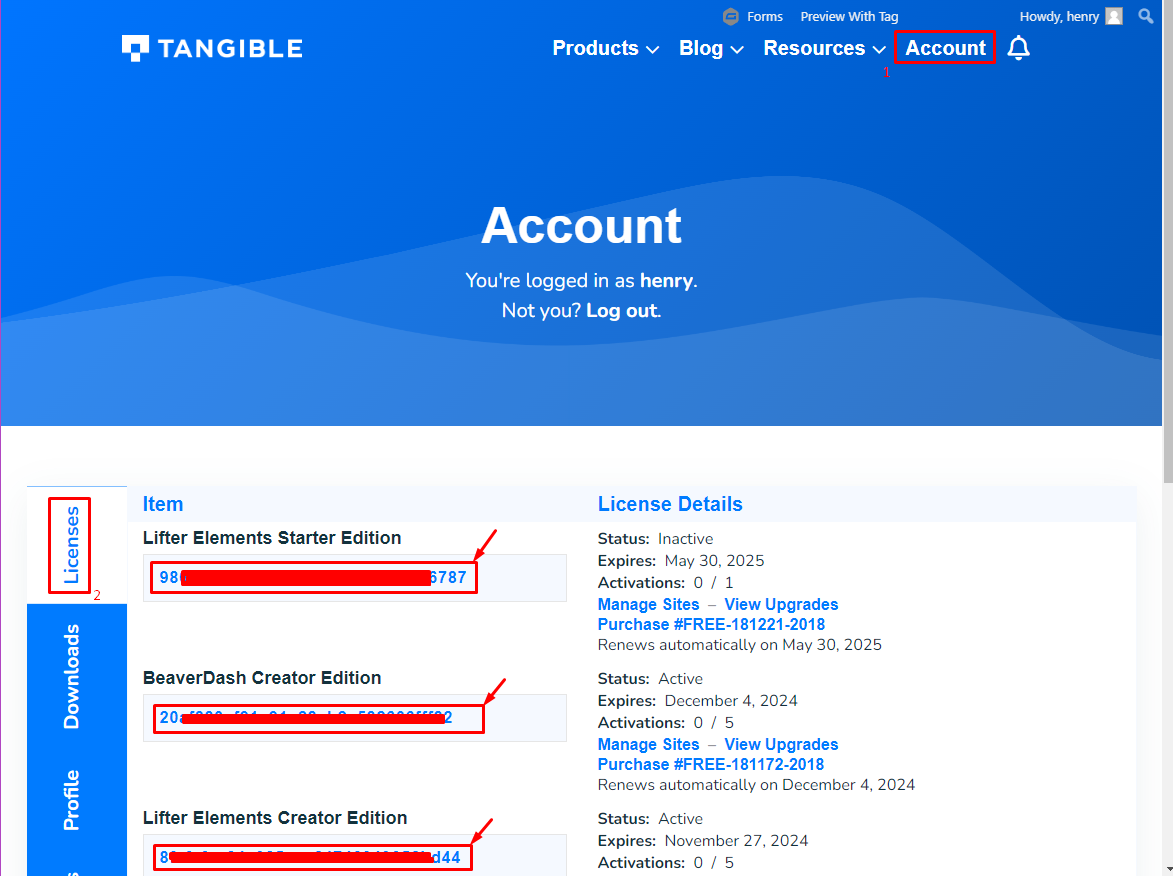
- Copy your license key and go to the Settings > Lifter Elements in your WordPress dashboard.
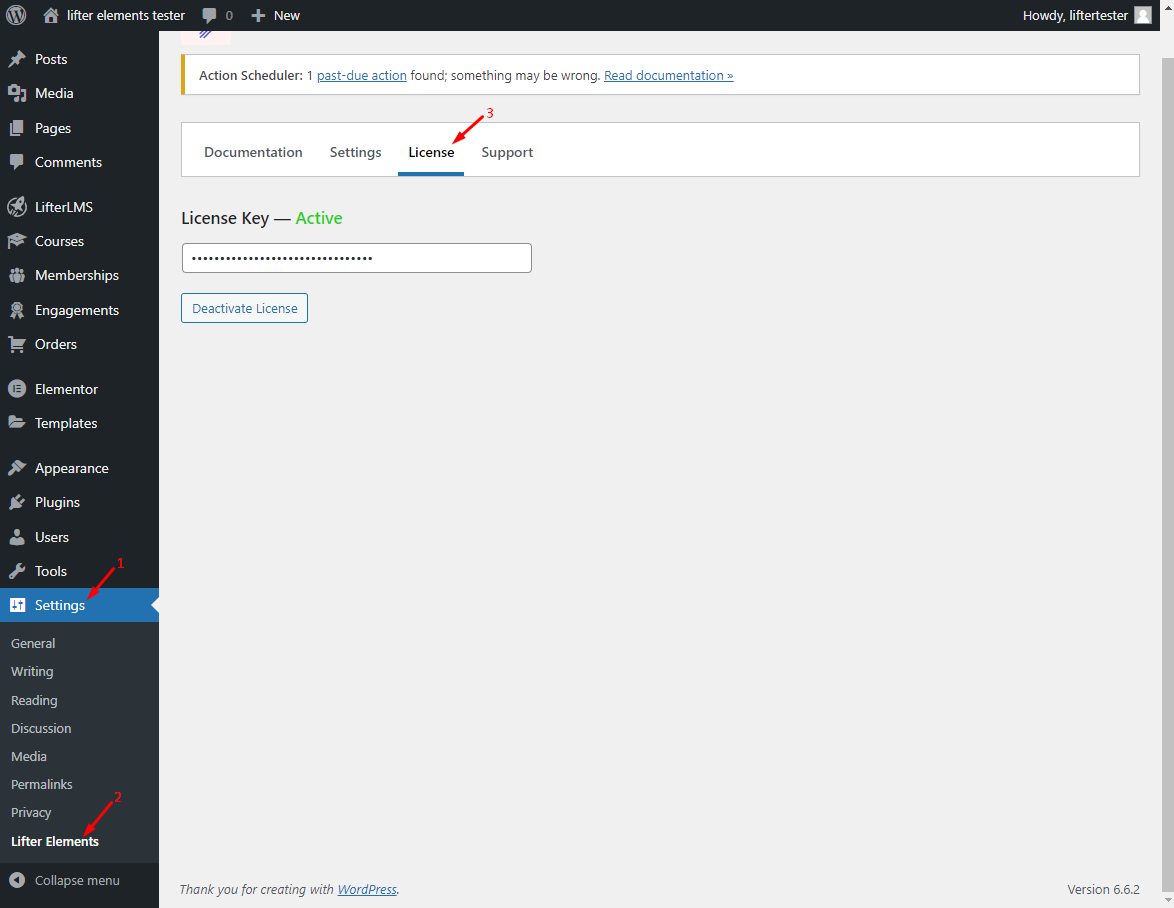
- Click on the License tab, paste your license key, and click on the Save License Key button. After you activate it successfully you will see Active status turn green.
There are several licenses available for Lifter Elements.
- Starter Edition - Supports 1 activations, shortcodes, dynamic tags, and widgets.
- Creator Edition - Supports up to 5 activations, all Starter Edition features, includes 3 importable templates, and conditional logic.
- Creator's Club - Our all-access pass membership that provides unlimited activations for all our plugins and access to all of our templates
- Multisite Edition - Supports everything that the Creator Edition does plus supports network activation for WordPress multisite.
Installing and Activating Lifter Elements on a Multisite
Lifter Elements can be installed and activated on a WordPress Multisite network to provide functionality across multiple sub-sites. Follow the steps below to correctly install and configure Lifter Elements for multisite environments. To install Lifter Elements on a WordPress multisite network, you will need to have the multisite option enabled on your install.
If you need help, you can follow this fantastic step-by-step guide on how to How to Start a WordPress Multisite Network from WordPress.org.
You have the option to either network activate Lifter Elements for all sub-sites at once or activate it on individual sub-sites as needed: Network Activation: When Lifter Elements is activated at the network level, the plugin is available on all sub-sites within the network. This option simplifies management but may lead to higher resource usage if all sub-sites don’t use the plugin. Sub-Site Activation: If you only need Lifter Elements on specific sub-sites, it’s better to activate it on those sites individually. This allows more granular control and helps optimize your network’s performance.
Looking for the WPMU/Multisite version of Lifter Elements? Find it here!
Install the plugin
- Log in to your Network Admin dashboard.
- Navigate to Plugins > Add New and upload the Lifter Elements plugin file.
- Choose between network or sub-site activation depending on your preference (as explained above).
For network activation, click Network Activate to make the plugin available across all sub-sites. For sub-site activation, go to the desired sub-site’s dashboard and activate Lifter Elements locally from the Plugins section.
Managing Updates
When managing a multisite installation, updates to Lifter Elements can be done from the Network Admin panel. However, it’s recommended to test updates in a staging environment before rolling them out across the network to avoid potential issues.
2. Basic Usage: Widgets
Once Lifter Elements is installed and set up, you can start using its widgets to build and customize your LifterLMS pages within Elementor. This section will guide you through the basic usage of Lifter Elements, from adding widgets to personalizing them for your courses and membership sites.
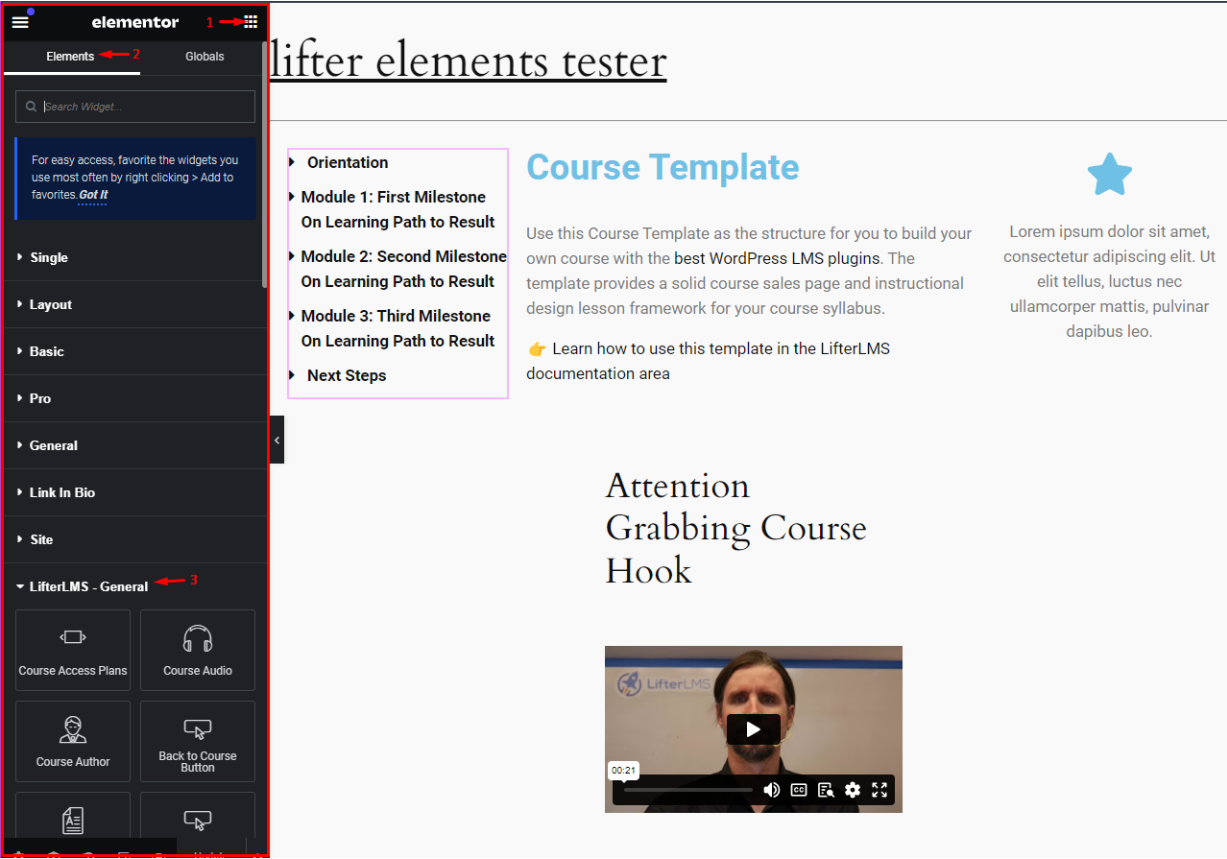
i. Adding Lifter Elements Widgets
The core feature of Lifter Elements is its ability to integrate LifterLMS functionality directly into Elementor’s builder. Here’s how to start using the widgets:
- Navigate to any page/template you’d like to edit in WordPress, or create a new one.
- Click Edit with Elementor to open the Elementor editor.
- In the Widgets Panel on the left, scroll down to find the LifterLMS - General widgets. These widgets will be grouped together and labeled for easy identification.
ii. Lifter Elements Widgets Overview
Lifter Elements gives you an impressive range of widgets tailored specifically for LifterLMS, making it easy to enhance your online learning platform with Elementor's powerful design capabilities. If you scroll down the widget list you will see that Lifter Elements adds a section called LIFTERLMS - GENERAL.
Our widgets give you full control over the layout and design of LifterLMS course and lesson pages directly within Elementor. Each widget is dynamic, meaning it automatically recognizes the course or lesson it’s on, so you don’t need to manually specify which content to display. For example, a syllabus widget placed on a course page will show the relevant course syllabus without any additional configuration.
Additionally, our widgets strip out the default Gutenberg blocks added by LifterLMS, allowing you to style and format your content entirely within Elementor. When a course widget is placed on a lesson page, it will dynamically display the data from the course that the lesson belongs to.
Lifter Elements widgets work seamlessly whether you’re editing individual courses/lessons or building templates with Elementor’s Theme Builder. However, we strongly recommend using the Theme Builder to take full advantage of Elementor’s templating system.
Please note that some widgets, like Course Author and Access Plans, require Elementor Pro, as they depend on the Pro features like the Carousel widget.
Here's a breakdown of the available widgets across different categories:
Course Widgets
- Access Plans (Elementor Pro): Displays the access plans for a course, allowing users to purchase or enroll. This widget requires Elementor Pro to be usable.
- Audio: Embeds audio content within course materials, enriching the learning experience.
- Author (Elementor Pro): Displays course authors' information with customizable layouts. This widget requires Elementor Pro to be usable.
- Back To Course: Adds a button for easy navigation back to the main course page.
- Content: Displays course content in a structured layout, making lessons easy to navigate.
- Continue Button: Allows students to continue their courses from where they left off.
- Courses: Displays a list of courses offered, with various layout options.
- Meta: Shows metadata about the course such as difficulty, duration, and enrollment information.
- Outline: Provides an overview of course sections and lessons, helping students keep track of their progress.
- Prerequisites: Displays any required prerequisites that students must complete before accessing the course.
- Progress: Shows students their progress within the course.
- Reviews: Displays student reviews, building social proof and helping others decide on course enrollment.
- Syllabus: Outlines the course syllabus for students to see what's included.
- Video: Embeds video content directly within courses to deliver lessons in a visual format.
Lesson Widgets
- Audio: Adds audio content to individual lessons.
- Content: Displays the content of lessons in a customizable layout.
- Navigation: Provides navigation buttons between lessons for seamless user experience.
- Mark Complete Button: Allows students to mark a lesson as complete, helping them track progress.
- Video: Embeds video content into lessons, perfect for multimedia-based learning.
Membership Widgets
- Memberships: Displays membership levels, allowing users to join or upgrade their membership plans.
Plans Widgets
- Access Plan Button: Allows students to access a specific plan or subscription.
- Checkout: Embeds the checkout page for purchasing courses or memberships.
- Pricing Table: Displays pricing plans in a visually appealing table format, helping students compare options.
User Widgets
- Achievements: Displays earned achievements, such as course completions or other milestones.
- Certificates: Displays certificates awarded upon course completion.
- Courses: Displays a list of courses that the logged-in user is enrolled in or has completed.
- Dashboard: Provides users with a customizable dashboard showing their course activity and progress.
- Login: Adds a login form for users to access their accounts.
- Memberships: Displays the user's current memberships.
- Registration: Provides a registration form for users to create an account.
iii. Customizing Widgets in Elementor
Each Lifter Elements widget can be customized using Elementor’s styling tools. Here’s how you can modify the appearance of your LMS content:
- Editing Widget Content*: Once a Lifter Elements widget is added to your page, click on the widget in the Canvas Area. The Content Tab will appear on the left side, allowing you to adjust the information being displayed, such as the course title, author name, or progress data.
- Customizing Layout and Design: Switch to the Style Tab to adjust typography, colors, spacing, and other visual elements. You can personalize the look of each widget to match your branding or course aesthetic.
- Advanced Settings: The Advanced Tab offers additional controls for positioning, animations, and responsive design, ensuring that your LMS content looks great across all devices.
Not all settings and customization options are universal across all widgets in Lifter Elements. The specific options available for each widget depend on the type of widget being used. For detailed information on the customization options for each widget, please refer to the individual widget documentation.
iv. Saving and Reusing Widget Configurations
Elementor allows you to save your customized widgets as templates, making it easy to reuse your designs across different pages:
- Once you’ve designed a widget, right-click the widget box in the Canvas Area and select Save as Template.
- Give your template a name and save it.
- When creating new pages, simply click the Add Template button in Elementor, select your saved template, and insert it into the page.
This feature streamlines the process of designing multiple course or lesson pages with consistent layouts.
- Preview Changes: As you customize widgets, you can use Elementor’s Preview Changes feature to see how the page looks in real time.
- Responsive Design: Use Elementor’s responsive design controls to ensure that your course pages look great on both desktop and mobile devices.
- Widget Templates: Don’t forget to take advantage of Elementor’s global widgets if you need to update the same widget across multiple pages from one place.
3. Basic Usage: Dynamic Tags
Adding dynamic tags to your Elementor templates allows you to dynamically pull in content from LifterLMS courses, lessons, memberships, and more. Dynamic tags are part of Elementor’s core functionality, which Lifter Elements leverages to bring LMS data into your Elementor designs. Here’s some general steps for adding Dynamic Tags:
i. Adding Lifter Elements Dynamic Tags
- Access the Widget Editor: In Elementor, navigate to the template or page where you want to add dynamic content. Open the editor and choose the widget where you want to add the dynamic tag.
- Locate the Dynamic Tags Icon: In the widget’s content settings, look for the dynamic tags icon next to the field where you can enter content (e.g., next to text, URLs, images, etc.). This icon typically appears as a stack of three squares.
- Select the Dynamic Tag: Click the dynamic tags icon to reveal a dropdown list of available tags. Scroll through the options and select the tag relevant to your content (e.g., Course Title, Lesson Content, Plan Price). Lifter Elements dynamic tags will be grouped under the respective categories, such as courses, lessons, or memberships.
- Customize and Apply: Once the tag is selected, the dynamic content will be automatically pulled into the widget. You can further customize the design and layout using Elementor’s styling and advanced options to ensure the dynamic content fits your overall design.
For more detailed instructions on how to work with dynamic tags in Elementor, please refer to the Elementor Dynamic Tags Guide.
ii. Lifter Elements Dynamic Tags Overview
Lifter Elements enhances Elementor’s capabilities by allowing you to dynamically pull in content from your LifterLMS setup. Dynamic tags are powerful tools for customizing your learning platform, as they allow you to insert dynamic data such as course details, lesson information, and membership plans into Elementor templates. Below is a comprehensive list of the dynamic tags available with Lifter Elements:
A list of available Dynamic Tags can also be found under Settings > Lifter Elements while logged into the WordPress dashboard.
Course Dynamic Tags
- Audio: Embeds audio files associated with the course.
- Categories: Displays the categories under which a course is grouped.
- Content: Outputs the main content from the course description.
- Lesson Count: Displays the total number of lessons within the course.
- Difficulty: Shows the course difficulty (e.g., beginner, intermediate, advanced).
- Estimated Time: Displays the estimated time to complete the course.
- Featured Image: Outputs the course’s featured image.
- Featured Plan Enroll Text: Displays the text for the enrollment button of the featured plan.
- Featured Plan Frequency: Shows the billing frequency for the featured plan (e.g., monthly, yearly).
- Featured Plan Name: Outputs the name of the featured plan for the course.
- Featured Plan Price: Displays the price of the featured plan.
- Featured Plan URL: Provides the URL to the featured plan for easy access.
- Course Progress: Displays a student's progress within the course.
- Information: Outputs course-related information like start date and instructor.
- Plan Enroll Text: Displays the enrollment button text for a specific plan.
- Plan Frequency: Outputs the billing frequency for a specific access plan.
- Plan Name: Shows the name of a specific course plan.
- Plan Price: Displays the price for a specific plan.
- Plan URL: Provides the URL link to a specific plan.
- Title: Outputs the course title.
- Tracks: Displays course tracks, allowing you to group related courses.
- Video: Embeds video content associated with the course.
General Dynamic Tags
- Notices: Displays notices or announcements related to the LMS site.
Lesson Dynamic Tags
- Audio: Embeds audio files for the lesson.
- Back To Course: Provides a link to navigate back to the course page.
- Content: Displays the main content from the lesson.
- Next Link: Provides a link to the next lesson.
- Next Name: Displays the name of the next lesson.
- Next URL: Provides the URL for the next lesson.
- Previous Link: Provides a link to the previous lesson.
- Previous Name: Displays the name of the previous lesson.
- Previous URL: Provides the URL for the previous lesson.
- Video: Embeds video content within the lesson.
- Drip Days, Hours, Minutes, Seconds: Displays the countdown for when a lesson will be unlocked based on drip settings.
- Drip Countdown: Outputs a complete countdown timer until the lesson is accessible.
Section Dynamic Tags
- Title: Displays the title of a course section, allowing you to organize content clearly.
4. Basic Usage: Shortcodes
A shortcode is a small piece of code that makes it easy to add various functions or display content on your website without needing to write complex code. By adding a shortcode to a page, post, or widget area, you can embed content like images, videos, or other dynamic information directly into your site.
Lifter Elements offers a range of shortcodes that extend the functionality and design capabilities of LifterLMS when used with Elementor. These shortcodes provide greater flexibility in customizing your course content and design. They are also compatible outside of Elementor, allowing you to use them with Gutenberg or anywhere else on your website.
A shortcode looks something like this: [le-courses-audio-url]
Want to learn more about shortcodes? Check out some other resources below:
- Official WordPress shortcodes and definitions
- Official WordPress.org shortcode API information
- LifterLMS shortcodes
i. Adding Lifter Elements Shortcodes
ii. Lifter Elements Shortcodes Overview
Course Shortcodes
Lifter Elements comes with a list of Course Shortcodes that can be found under Settings > Lifter Elements while logged into the WordPress dashboard.
Audio
- [le-courses-audio-url]
Content
- [le-courses-content]
Difficulty
- [le-courses-difficulty]
Estimated Time
- [le-courses-estimated-time]
Featured Image
- [le-courses-featured-image-url]
Featured Plan
- [le-courses-featured-plan-enroll-text]
- [le-courses-featured-plan-frequency]
- [le-courses-featured-plan-ID]
- [le-courses-featured-plan-name]
- [le-courses-featured-plan-price]
- [le-courses-featured-plan-URL]
Progress
- [le-courses-progress-percent]
- [le-courses-progress-percent-number]
Plan
- [le-courses-plan-enroll-text]
- [le-courses-plan-frequency]
- [le-courses-plan-ID]
- [le-courses-plan-name]
- [le-courses-plan-price]
- [le-courses-plan-URL]
Title
- [le-courses-title]
Tracks
- [le-courses-tracks]
Video
- [le-courses-video-url]
Lesson Shortcodes
Lifter Elements comes with a list of Lesson Shortcodes that can be found under Settings > Lifter Elements while logged into the WordPress dashboard.
Audio
- [le-lessons-audio-url]
Content
- [le-lessons-content]
Next
- [le-lessons-next-ID]
- [le-lessons-next-URL]
Previous
- [le-lessons-previous-ID]
- [le-lessons-previous-URL]
Video
- [le-lessons-video-url]
Section Shortcodes
Lifter Elements comes with a list of Section Shortcodes that can be found under Settings > Lifter Elements while logged into the WordPress dashboard.
ID
- [le-sections-ID]
Title
- [le-sections-title]
5. Creating Lifter Elementor templates
By default, Elementor Pro doesn't correctly detect the LifterLMS content, so it's missing from the list of available locations in the Theme Builder. This prevents you from creating layouts for lessons and some of the kinds of content added by various LifterLMS add-ons. With Lifter Elements, the LifterLMS post types are accessible as Theme Builder locations so you can change the style and layout of 1000 lessons at a time using a single template.
We offer importable templates to get you started using Lifter Elements. They can be purchased individually, and we include some with the Creator Edition. All templates we offer are included in the Creator's Club all-access membership. Templates are a way to quickly import new layouts you can apply to your courses, lessons and catalog. They can also be a great way to see what you can accomplish using the plugin. It's possible to target different templates to different courses or lessons and have many present on your site at the same time.
i. Creating your first templates
ii. How to Build a Course Archive or Catalog Template
Creating a custom Course Archive or Catalog template allows you to design a unique layout for displaying all your available courses. Lifter Elements integrates seamlessly with Elementor, giving you complete control over how your course archive page's looks and functions.
- Create a New Archive Template
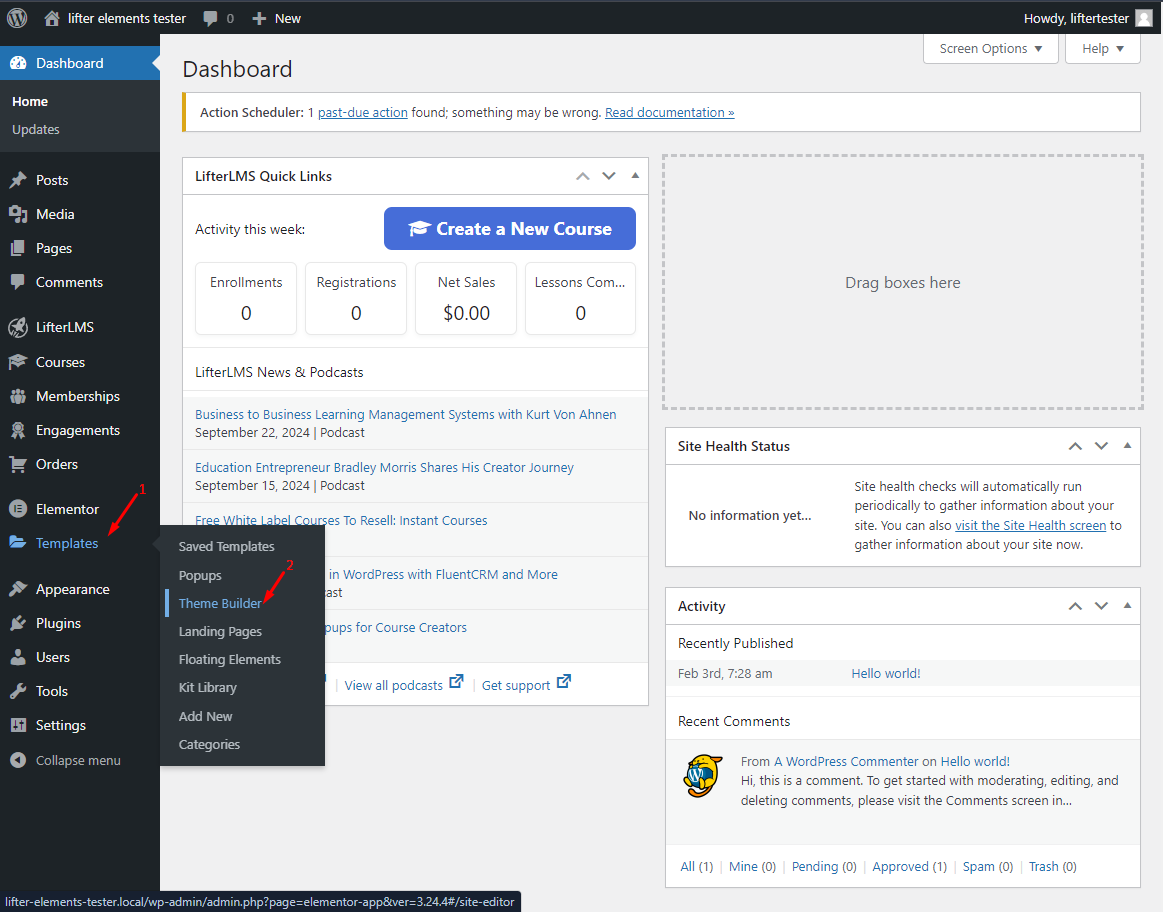
- Navigate to the Theme Builder: In the WordPress dashboard, go to Templates > Theme Builder
- Select the Archive tab.
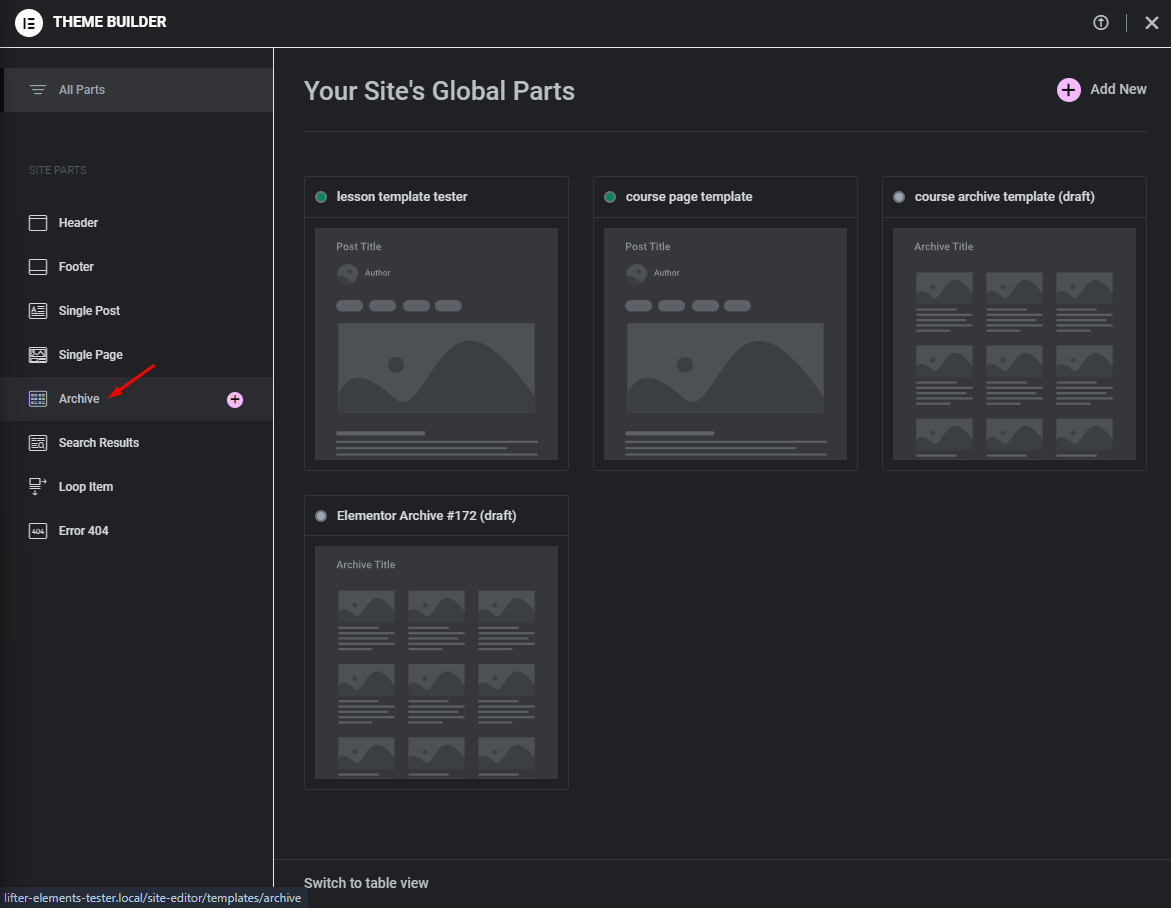
- Add a New Archive Template: Click the Add New button at the top of the screen
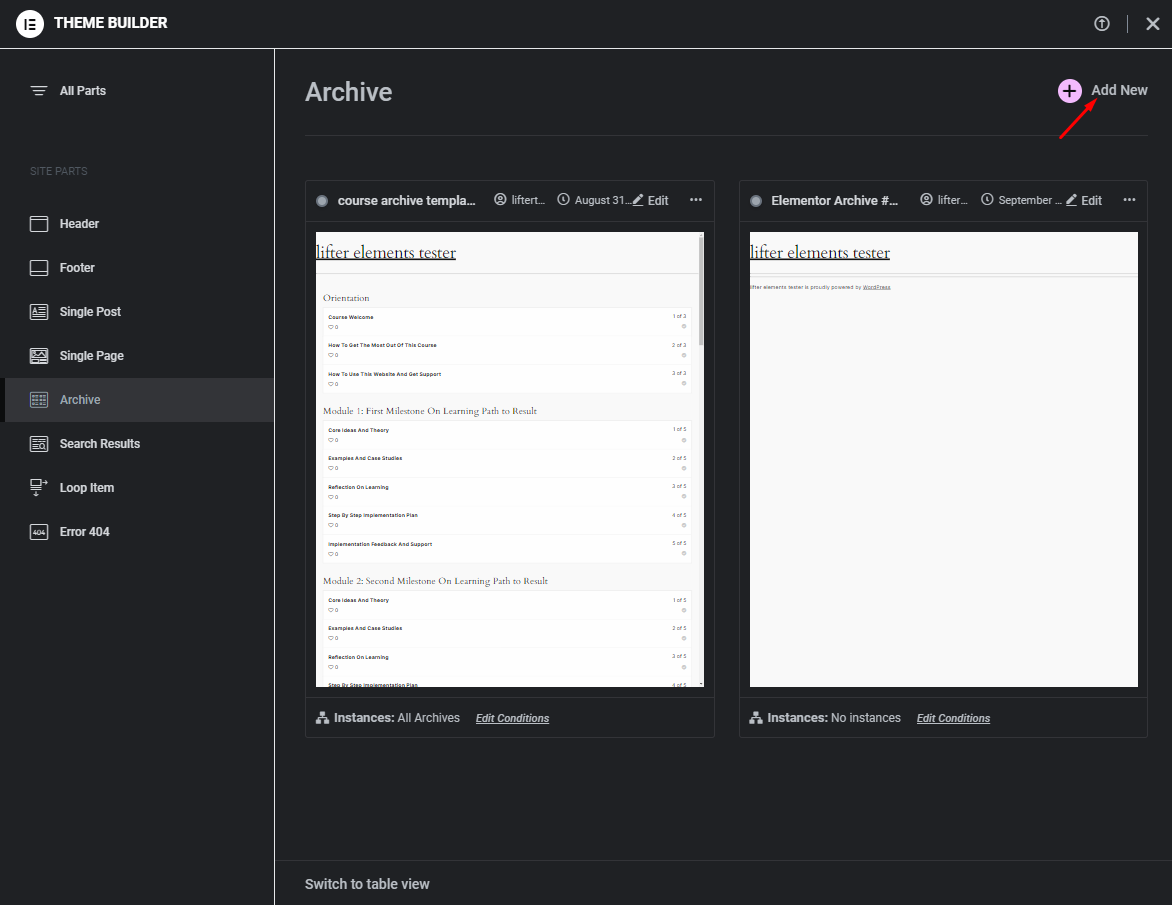
At this point, you can choose to start your new template with pre-built designs or you can start from scratch with a blank template.
- Choose a Pre-Designed Template (Optional): If you prefer to start from a pre-built design, Elementor will present several template options that you can select and then customize. You can view pre-built designs for archive templates if you select Archive from the dropdown menu.
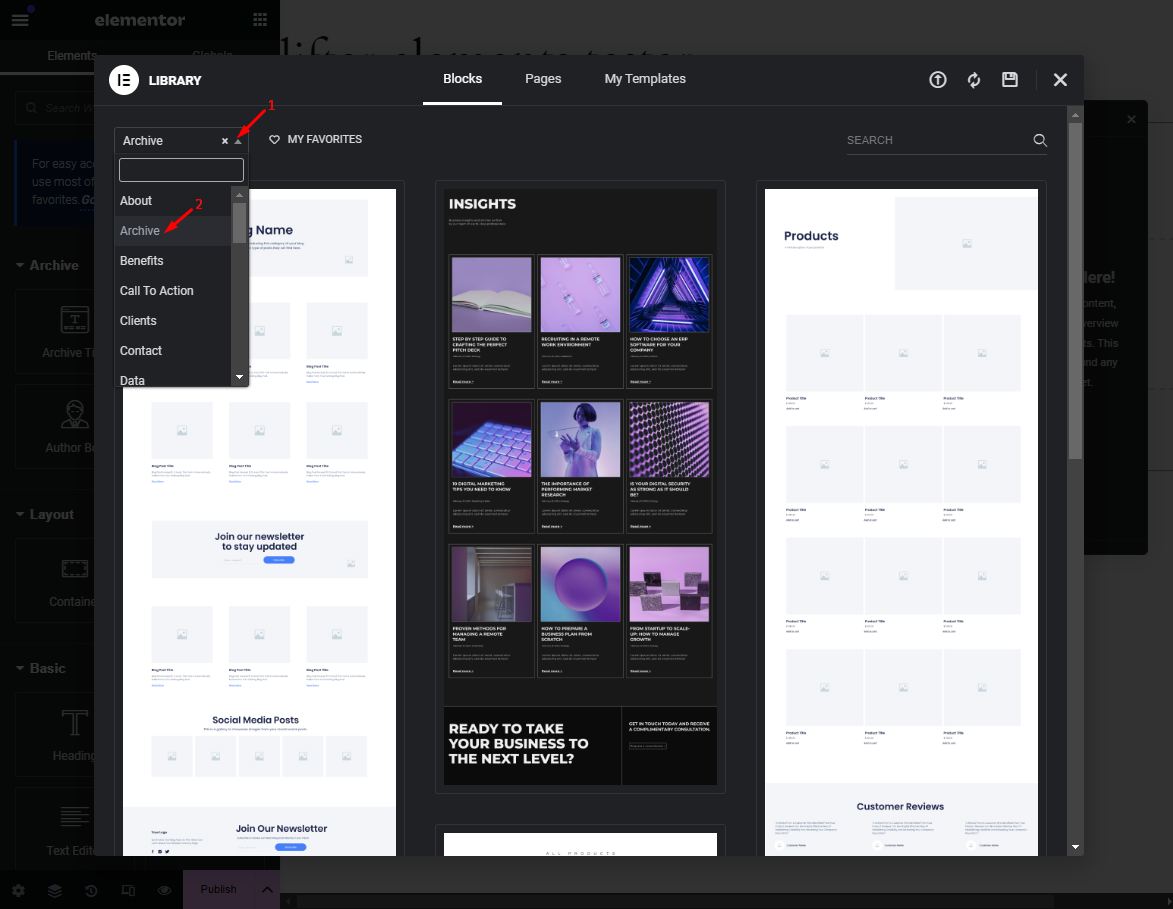
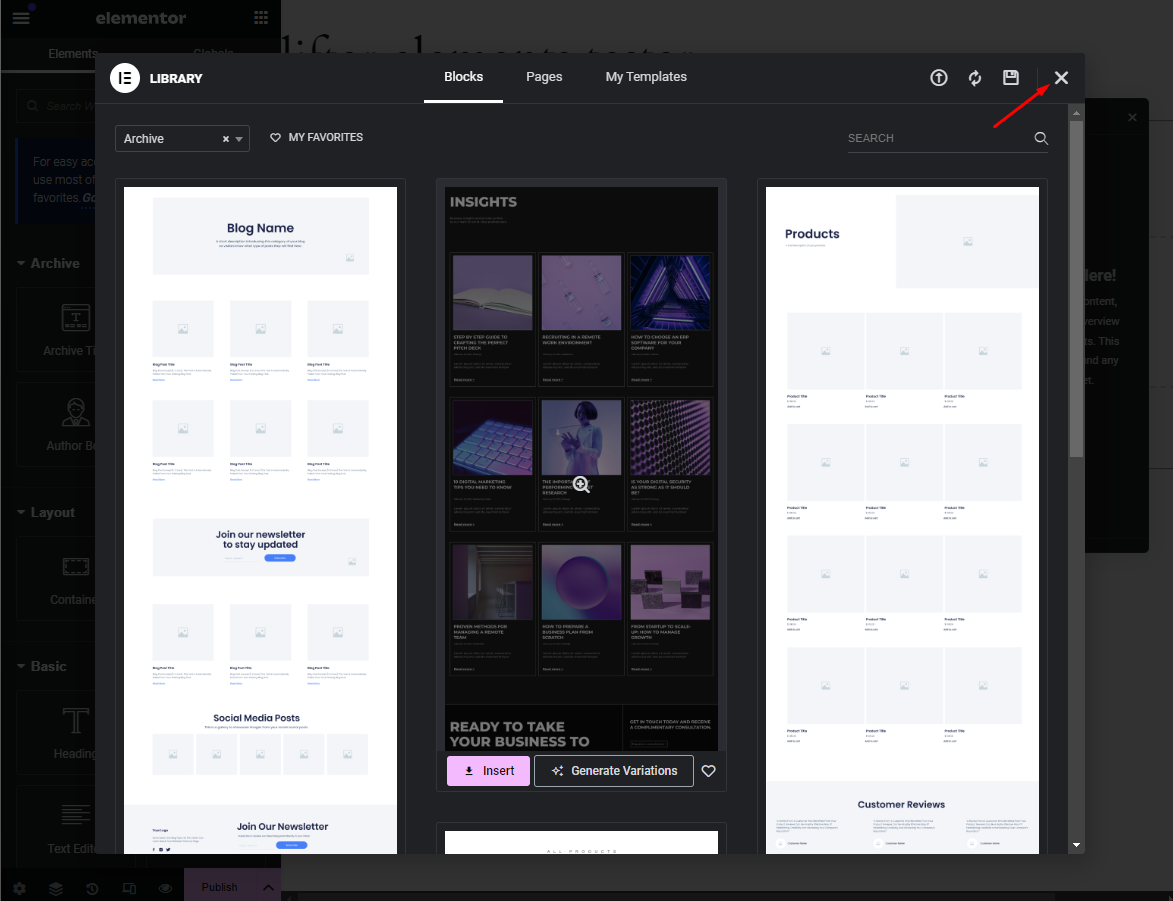
- Start from Scratch (Optional): If you want to start from scratch, just close the Template Library window.
- Design Your Course Archive Template
-
Add a Course Listing Widget: In the Elementor editor, drag and drop the Courses widget from the Widgets panel into your design canvas. This widget will automatically display all available courses in a grid or list format.
-
Customize the Widget: You can adjust the layout, style, and appearance of the courses. This includes changing the number of columns, image sizes, and typography. Additional settings like course filters and pagination can also be configured to help users find the right course quickly.
Widgets that are commonly used to build the Course Archive template:
- Heading
- Course List
-
Include Additional Information: To enrich your course archive, you can add other widgets, such as Course Title, Featured Image, and Course Progress to give students a preview of course content or progress.
-
Dynamic Tags: Use Elementor’s Dynamic Tags to pull course-specific information into your template, such as course price, lesson count, or difficulty level. These tags allow for a highly dynamic and personalized course catalog.
- Assign the Template Once you’re satisfied with your design:
- Click Publish and set display conditions. Select the Courses Archive option under Display Conditions to ensure the template applies to all course archive pages.
After publishing, this template will automatically replace the default course archive layout on your site. More information about setting Display Conditions can be found here.

- Preview and Fine-Tune Preview your course archive page to ensure it looks the way you intended. You can make any additional adjustments directly in the Elementor editor. Once you’re happy with the final look, your custom course archive will be live and ready for students to explore.
By following these steps, you’ll be able to create a fully customized and dynamic Course Archive template that enhances user experience and showcases your courses effectively.
iii. How to build a Lesson Template
Here's a Walkthrough of the basics of setting up a Single Lesson template and which widgets are commonly used so you can understand how the structure is set up.
- To get started, make sure you're logged into the WordPress Admin dashboard and navigate to Templates > Theme Builder.

Click Add New next to My Templates at the top of the screen.

- For the Template Type, you will want to choose Single Post.

- Here are the widgets that are commonly used to build the template:
- Post Title
- Back to Course Button
- Lesson Video
- Lesson Content
- Course Outline
- Lesson Navigation
- Mark Complete Lesson

- When the template is complete, we will need to tell the Theme Builder how we want the Lesson template to be displayed. Click on the Green Button in the bottom-left-corner of your screen, then on Display Condition.

You can include this Lesson template to display however you like, there is a lot of flexibility with the display conditions. For this example we used All.

iv. How to build a Course Template
Here's a walk-through of the basics of setting up a Course Template and which widgets are commonly used so you can understand how the structure is set up.
- To get started, make sure you're logged into the WordPress Admin dashboard and navigate to Templates > Theme Builder.
Click Add New next to My Templates at the top of the screen.
- For the Template Type, you will want to choose Single Post.
- Here are the widgets that are commonly used to build the template:
- Post Title
- Course Author
- Icon Box (using the course length dynamic tag)
- Icon Box (using the course difficulty dynamic tag)
- Course Access Plans
- Course Video
- Course Syllabus
- Course Meta
- Course Continue Button

When the template is complete, we will need to tell the Theme Builder how we want the Lesson template to be displayed. Click on the green button in the bottom-left-corner of your screen, then on Display Condition.
You will want to select Courses for the display condition which will show a list of all of the courses that apply when using this template.

Conditional Logic (included in Creator Edition)
Lifter Elements allows you to dynamically show or hide widgets, sections and columns (now called inner sections) in Elementor. This allows you to shape each student's unique experience with your course platform.
The Conditional Logic System
Conditional logic is available in the Creator Edition of Lifter Elements. Our conditional logic system allows you to hide or show different elements on the page based on certain conditions that you set up. You can set these conditions on widgets, sections and columns (now called inner sections). The panel is accessible from the "Advanced" tab of any widget.

All of our plugins share the same conditional logic panel, so if you install another plugin of ours that adds conditions they will show up in the same panel as the Lifter Elements conditions and can be combined with them.
The panel allows you to create rule groups and add rules to those groups. ALL the conditions in a rule group must be met in order for the widget to be displayed. If you set up multiple rule groups on the same widget, the widget will display if all the conditions in ANY of the rule groups are met.
You can see a list of current conditions available here
Example: Hiding the Course Access Plan widget four users that are already enrolled in the course
- Click on the widget you want to apply the conditional logic to, then on the edit screen, click the Advanced tab.
- You will see a section called Conditional Logic .
- Click on Open Conditional Logic Settings in that section.
- You will then be shown the conditional logic panel which allows you to set the conditions and rules to the specific widget in order to be displayed or hidden.
-
Select User enrollment status for the first rule, then is not for the second column, and Enrolled in current course for the third option.
-
This will set the different pricing for the access plans that will be displayed to the users who are not enrolled in the course already.

- After this is done, make sure you update your page to save changes to the course.
- To test and verify this is working, view a course that a user is currently enrolled in and the Course Access plan shouldn't show up in the sidebar. If you view a course that a user is not enrolled in, the Course Access plan widget will be displayed.
Available Conditions

Completion Status
This status applies to whether a user has completed or not completed a certain lesson or course.
| Available rules | |||
|---|---|---|---|
| Current Lesson | is complete/incomplete | ||
| Current Course | is complete/incomplete | ||
| Specific Course | [Course Name] | is complete/incomplete | |
| Specific Lesson | [Lesson Name] | is complete/incomplete |
Course Started Status
This status applies whether a user has started or not started a course.
| Available rules | |||
|---|---|---|---|
| Current Course | is started/not started | ||
| Specific Course | [Course Name] | is started/not started |
User Enrollment Status
This status applied whether a user is or is not enrolled in the current course.
|Available rules|| |:---|:----:|:---:| ||is|Enrolled in current course| ||is not |Enrolled in current course|
Importing & Installing Templates
Where can I get some templates?
We offer several different ways to download and install one of our plugins for Lifter Elements.
- We sell each template directly on the website if you'd like to buy them individually.
- We include some templates in the Creator Edition of Lifter Elements that you are able to download from your account.
- We also have a membership called Creator's Club Creator's Club which gives you access to all of our plugins and templates with a single license.
Installing a Lifter Elements Template
You cannot upload these templates through the WordPress importer. You must use the Elementor import utility.
If you haven't watched our videos on What is Lifter Elements or learn the course structure and lesson structure, we recommend doing that first to get a solid foundation before importing.
Lifter Elements lets you import pre-made templates through Elementor's theme builder to change the look of your LifterLMS content in just a few minutes. Whether you've purchased one of our templates directly, or received them through the Creator Edition or Creator's Club, the steps to install them are the same:
- First, you'll want to download a template for Lifter Elements from your Tangible Account. Login, browse to Downloads and click Download Now.

- Unzip the theme archive. Next, you'll want to login to your WordPress Admin and navigate to Templates > Theme Builder > Import Templates at the top of the page.
![]()
Click on the button labeled Upload Plugin, then Choose file. Browse your computer for the template file and click Import Now, you will see the template files listed after they are successfully imported.


-
The next step is to set up the Display Conditions for each template. If you haven't done this, you can learn by watching the How to create your first template video.
-
Once the display conditions are set up, you can check to make sure things are working by viewing your courses page.
What to do with the CSS file?
Our styling is included in each template under Settings > Advanced, however, we recommend that you remove it from there and move it to either Customizer > Custom CSS or to your child theme's stylesheet to avoid redundant styling and in order to be able to make global changes.
View a template demo
We have demo sites set up if you'd like to look at the template before you use it to understand what it might look like.